adding details - tiled diffusion + inpainting
- denitr
- Nov 26, 2024
- 7 min read
Updated: Sep 18, 2025
This advanced guide is for programs: A1111, Stable Diffusion ReForge, and Currently the most updated one that should be preferable to use Stable Diffusion Forge
Before reading this, you should have basic understanding of 'Stable Diffusion'. If not, search for some youtube tutorials first.
before you start generating. DO NOT USE this option. I absolutely hate developers of A111 for even having this in the program. at best it makes your gens just larger size. and if properly configured it will just waste your GPU power for gens you will not like anyway.

Out of perhaps 100 rawgens images, you’ve finally created a 1024x1024 image that you’re happy with.

Just look at those eyes. Everyting is very low detail.
so you take the image, and put it here:

You can use the same prompt and other settings as your original image, but feel free to experiment as well.
Set the scale to 1.5x for now, but you can adjust it later depending on what your GPU can handle.
Pay attention to the denoising strength: if it’s too low, there won’t be much change, but if it’s too high, the image might change too much. This is the main setting you’ll be working with and experimenting on.
And this is the result! 1536x1536 image, what an amazing jump in quality:


after enabling Never OOM integrated you can generate much higher resolution pictures, you can try to go as high as you want! just keep in mind that NoobAI and some of it's derivates are not very good at detail. So they are not the best to you for something like 3000x3000 detailed image.
Try different models in each img2img, experiment!
be sure to tweak fingers in photoshop along the way!
When you have multiple images with good parts, put them all in photoshop on top of each other and combine best parts.
That's it for the simplest solution.
Now lets go on with more difficult techniques:
Out of perhaps 100 rawgens images, you’ve finally created a 1024x1024 image that you’re happy with.

The Inpaint
the original picture im going to inpaint is 2000x2000 .
be sure to delete unwanted tags. now all the AI can see is the croch area, so for example tags like ,teeth, evil grin, yellow eyes, should be removed.
so from this you can understand if your original picture would be only 1024x1024 the inpainted picture would be then resized to fit the original and it would lose a lot of detail.

Of course, you can inpaint smaller areas, which might result in a slight loss of detail, or you can enlarge your image further to minimize this issue.
when you are inpainting picture that are larger than 3000x3000 you will start to experience lag on reforge, A111 Forge do not have this issue and is smooth when inpainting any size.
At start its best to inpaint with 1024px and the approved ratios resolutions by the model whitch usually are 640x1536,768x1344,832x1216,896x1152,
1024x1024,1152x896,1216x832,1344x768,1536x640. when everything is how you want it, you can ramp up the resolution to even 1700x1700 or more to make all the details. the higher resolution the lower denoise you should generally have to not introduce body warping.
inpainting padding helps the AI better understand the context of the image while preserving specific areas you don’t want to alter. Essentially, Stable Diffusion always creates a rectangle around the area you’ve marked for inpainting (including the padding), then denoises and reworks that section. You won’t actually see where the padding extends, so you don’t know exactly what area the AI actually gets to work with.

Let’s say you give the AI a small section of an image. How does it know if it’s part of a leg or a thigh? That’s why it’s important to provide enough context for the AI to recognize what it’s working with. You can do this by inpainting a larger area or by adding padding around the selected region. Both approaches essentially achieve the same goal. giving the AI more information to understand it.
However, using the inpainting option and just painting a larger area gives you better control and visibility over what the AI is working with. If the result is wrong, it’s easier to understand why. Padding, on the other hand, is more of a "closed box" approach, which can make understanding what went wrong more challenging.
When you create a circle in inpainting, the AI actually processes a square around it, even though you don’t see the square. Instead of limiting yourself to the visible circle, you could use the entire square area (or rectangle) to better blend the inpainted section with the surrounding image in Photoshop or another editing tool. This gives you more control over how the inpainting integrates with the overall picture.
---------------------------
Feffy's great example: i wanted to inpaint the chest logo. adding a dot on the ear expands the masked area to include the head so it won't randomly add faces when i'm too lazy to change the prompt. probably not gonna work well for anything too far from the head

its perfectly correct way to do it, and it will mostly work.
But Putting a dot reduces your control and understanding of what is going wrong in the picture. lets say you want to just correct your belly button area. You put your dot at the shoulder height and you wonder why it isn't working when your invisible result, that you don't see looks like this: Simply paint a clean square (or rectangle of the same ratio as your rectangle resolution) area and erase any unnecessary parts of the layer in Photoshop.

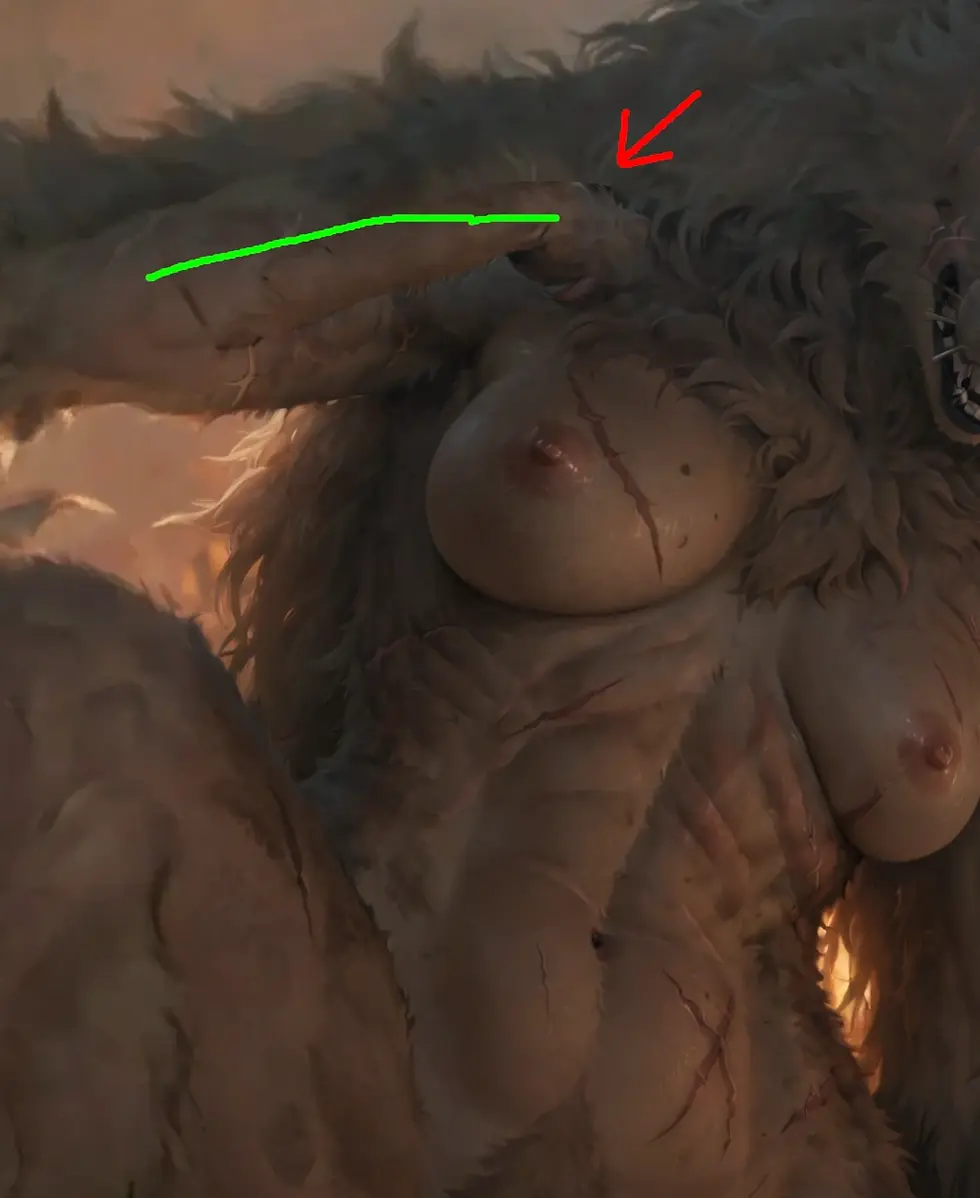
For example here. the red arrow points at randomly done hand, that actually moved the shoulder down the the green line, instead of where its supose to be. and that kept torso at wrong angle. if I would put there just dot, I would have no idea where is the issue. sure I could have solved it with lower denoise. but in this case I wanted it hight to the possible max.
-------
When combining inpaints with the main image, be aware that inpaints with high denoising strength can create noticeable seams, which you’ll need to get rid of.

This is the original picture, which I’ve already added as the bottom layer in Photoshop (it's GIMP, but I will be calling it photoshop) :

the image with extra high denoise that you wish to combine:
The top layer looks like this. The bigger the difference between the layers, the larger the transition(fade effect in opacity) you need to make between them.

here is the result:

Since this is a mix of fur and scales, it might be a good idea to create separate versions for the fur and scales and then combine them.

Be sure to enable this in settings, so it wont do like 8 steps because of low denoise

-----------------------------------
you can also watch this youtube video about tiled diffuison:
https://www.youtube.com/watch?v=44waH3sDYOM&start=199 About ControlNet: it’s really a magical tool. It allows you to use higher denoising levels without ending up with monstrosities.
I use mainly tile_resample -> TTPLANET_Controlnet_Tile_realistic_v2_fp16.XL [c32b8550]
and set range from 0 to 0.5 (that mean ControlNet will be active only first 50% of picture generation)
But you should study how ControlNet works yourself. Go to YouTube and search "A1111 ControlNet," and don’t just watch the videos! It’s important that you try out every setting on your own with multiple types of pictures.
I’d also advise you to check out Photoshop or GIMP videos about the tools you’ll need to adjust your image to your liking.
Warp tool: https://www.youtube.com/watch?v=vxYkv3k0Z_Q
Dodge & Burn and Smudge Tool https://www.youtube.com/watch?v=S9GTPoFuKdA
Amazing A111 inpaint plugin: https://github.com/oaf40/sd-webui-inpaint-mask-tools
Shadiversity youtube tutorial, it's old but shows how to properly combine photoshop and A1111 https://www.youtube.com/watch?v=u_v9Gbw6kcU
TerraRaptor's quick timelapse that will help you understand how to progress from start to finish on how to make a good picture : https://xcancel.com/SquawkWorks/status/1899908031514911144#m
I very dislike soft inpainting, I much prefer to properly merge the inpaint in photoshop, but here are some few tips and tricks if you wish to do it this way
Soft inpainting provided by starredsea5012
for this method you will need padding.
You won’t actually see where the padding extends, so you don’t know exactly what area the AI actually gets to work with.
you can enable in settings to see how the mask looks, it is useful if you are using soft inpainting


it is quite useful seeing how the mask looks like with the current mask blur and soft inpainting

Soft inpainting works by gradually transitioning from the original image to the generated content, allowing for a much smoother blend.


Tho it can cause some ghosting issues with too high mask blur. I had quite high on that one to show the differense. You can see double eyebrow.

The base soft inpainting settings are are ok,those are pretty easy to understand with the tips on the sliders

Pretty much only need to care about the first 2
If the mask is too close to the area you want to edit with soft inpainting on, it could cause it to not change it much
This is with mask blur 11, soft inpainting on, denoise 0.8. Barely any noticable lines from inpainting

Be sure to play with and add some other neat settings that are hidden.
For example "apply color correction" it tries to correct to inpaint color to match the colors that were there beforehand, so it should be much easier blend with the rest of the old picture.

the Tiled img2img (outdated, this is only for the most potato cards)

Set the resize to 1, then adjust your settings and denoising strength as usual.
If you’re using an outdated A1111 vanilla version, you’ll need to download and install two addons (tiled diffuison and tiled VAE).
For A111 Forge or A111 Reforge users, this feature is already available.

If you are using one of the best GPU on the market you may be actually able to img2img 2000x2000 image without this enabled, but normal mortals will have to use this option.
you should think about the tiled difusion when you are enlarging you image and adjust size to make good tiles, but if you have fast GPU it's not really important
If a single edge overlaps with its neighbor, then 48 pixels are "shared" between the two tiles along that edge. If you are experiancing seams, you might want to increase it.
The "Tile Batch Size" determines how many tiles are processed simultaneously (most people will set it as 1). If you run out of VRAM, the issue is likely related to either this setting or the VAE compression/decompression process. In that case enable 'Enable VAE Tiling' extention

Some models, like NoobAI, just suck at details, so choosing a good model is crucial. My favorite is Yiffymix. But there's no problem with using one model for rawgens and a different one for img2img.
Size of a tile can be anywhere from 1024px to about 1700px, if you go for higher resolution, issues will start happening, but some models handle it better than others.
this is the simplest optimal resolution for the worst GPU's. If you have better one you can go for larger tiles and bigger
tile overlap. Somthing like 1500x1500 tile and 200px overlap. bigger overlap, the less isues you will get.
If you don't care about computing eficiency, just throw there some estimate, it's fine. You don't need to calculate exact numbers.


Comments